NOTE: If you find you don't like reading amber-on-black, press the print button at the top of this page.
Choosing hardware for making your own firewall/router
Making your own little firewall that runs Linux doesn't have to be terribly difficult. Most people start off using a low-end PC for the job, but eventually move away from that because that's a power-hungry solution.
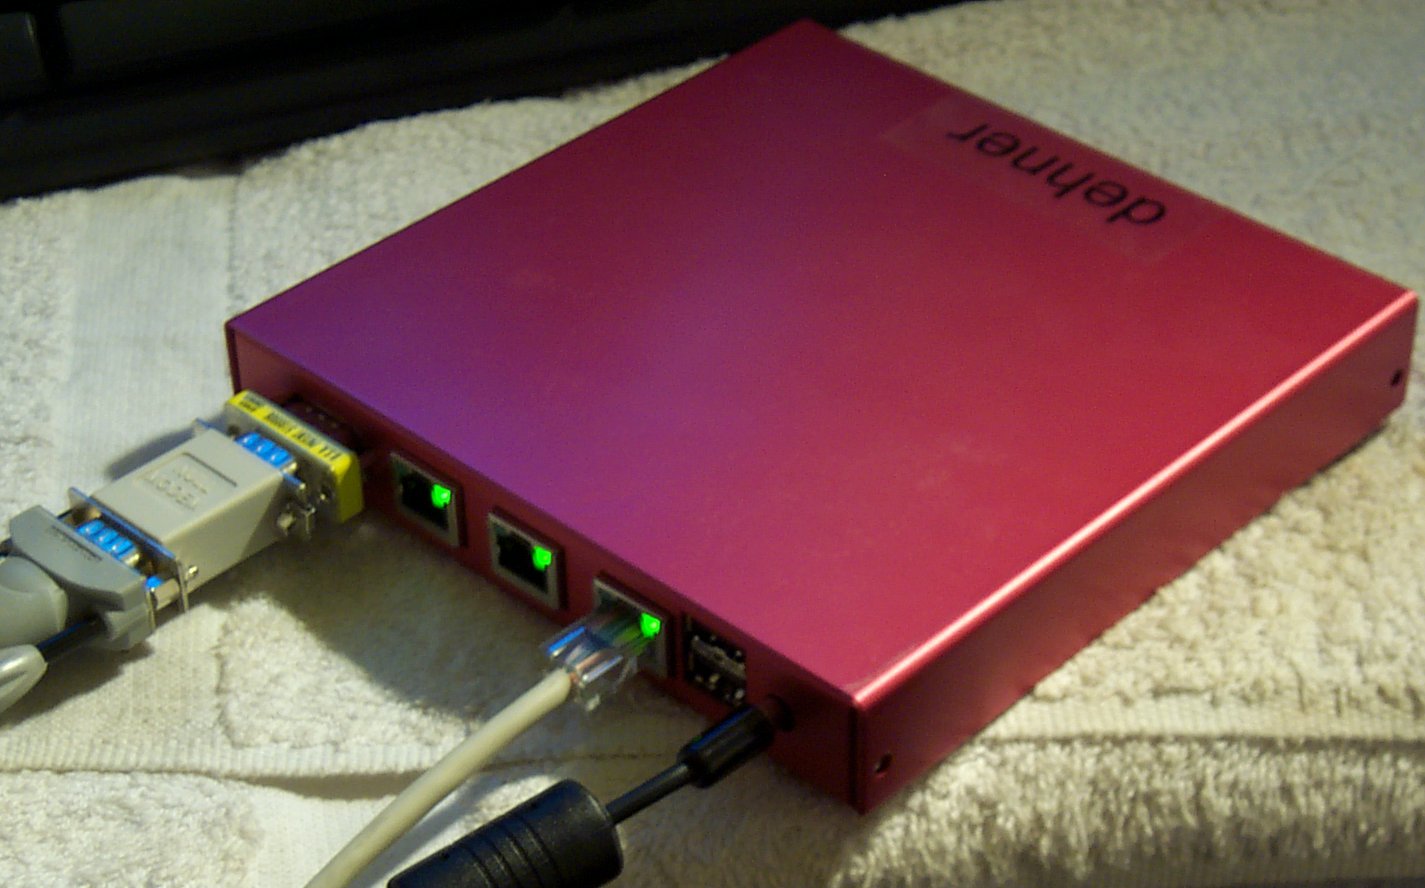
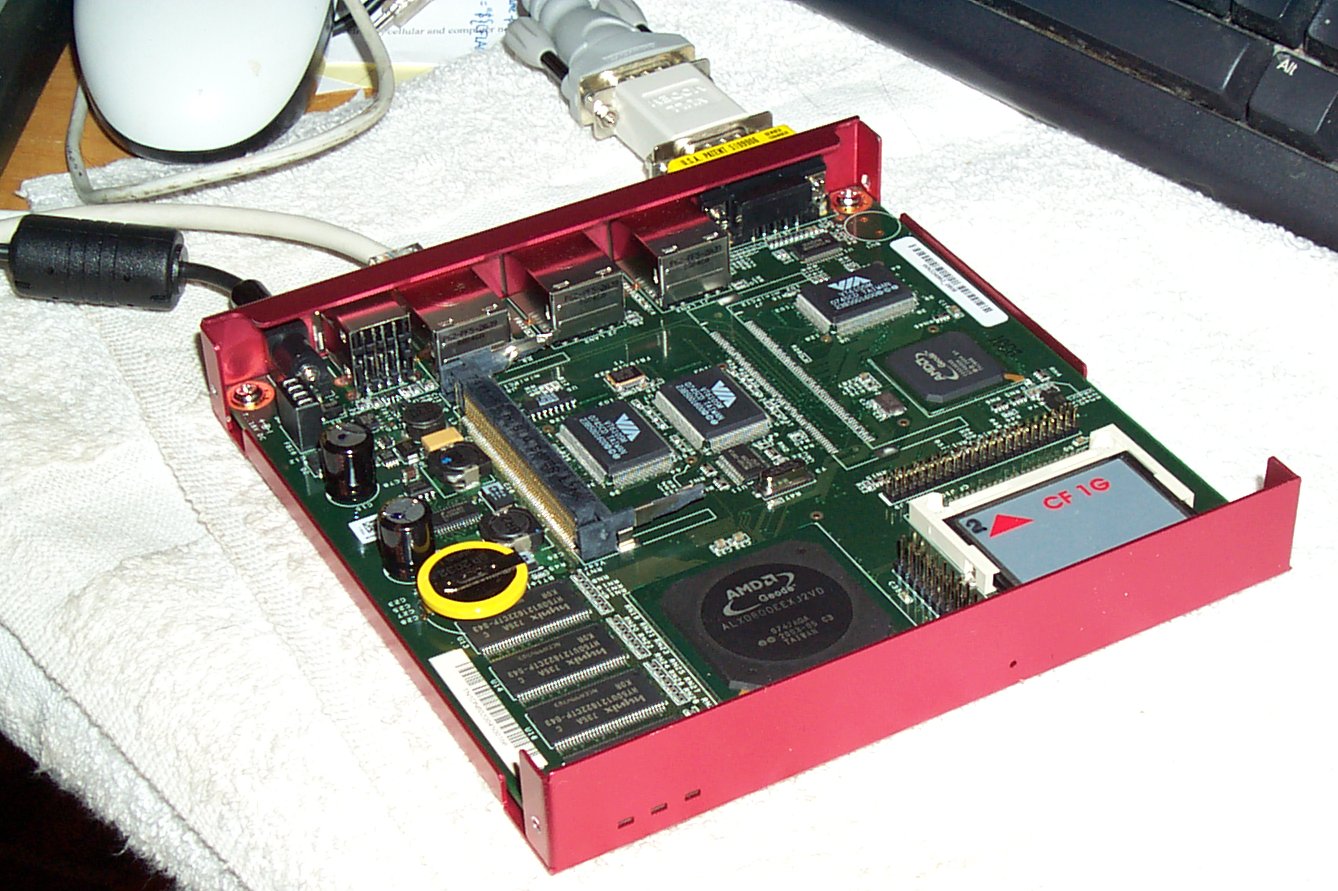
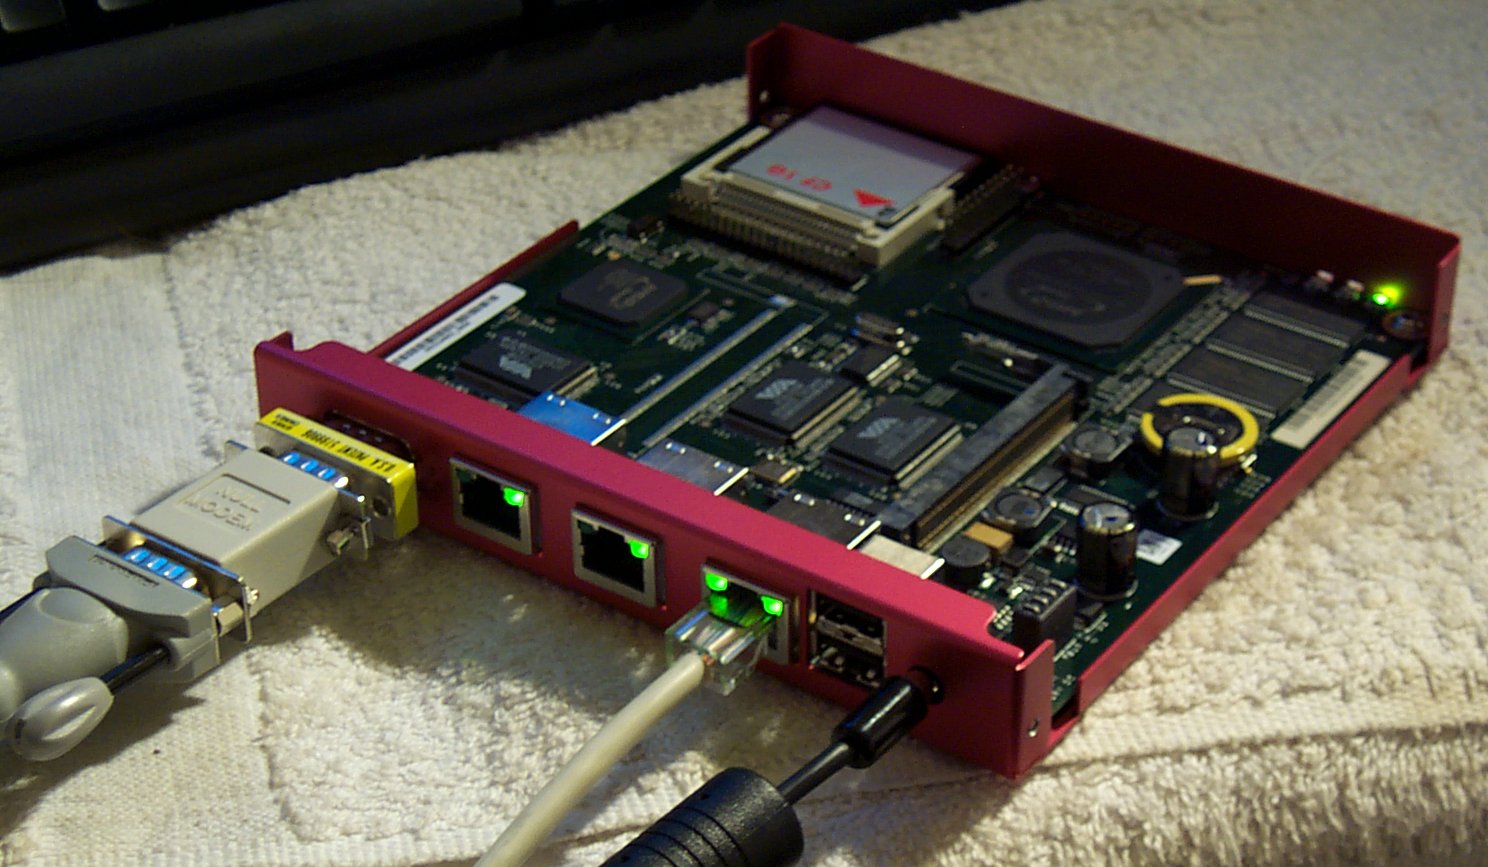
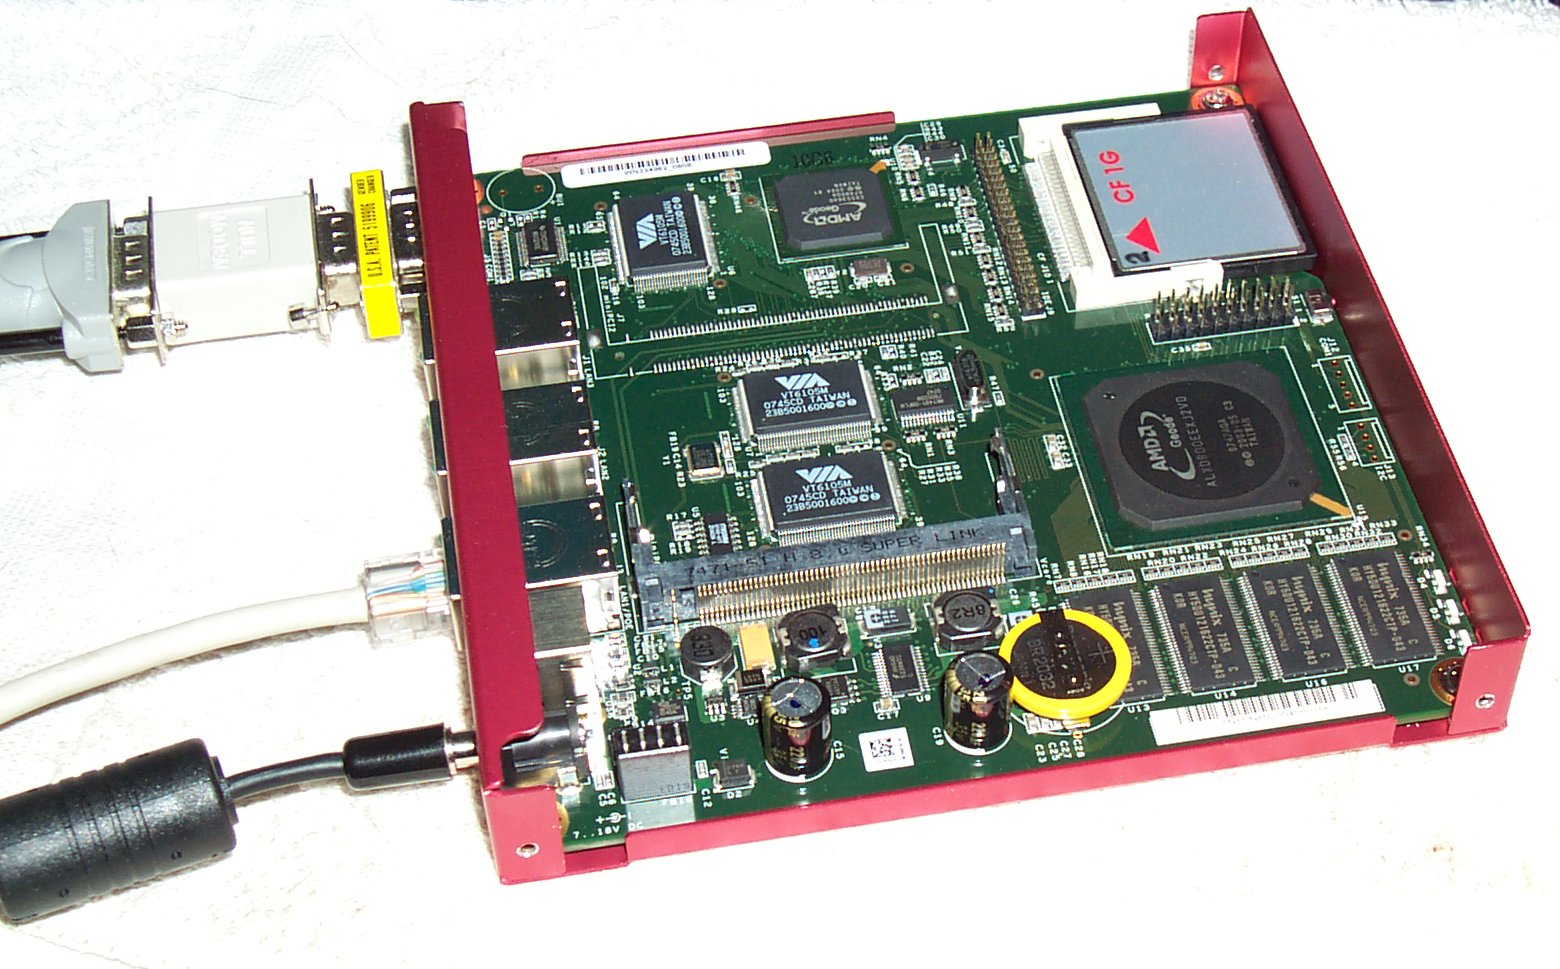
There are several choices, but I recommend one of the Alix boxes such as Alix2d3 ($137) from PC Engines along with a red USB case ($10) and a 1GB Compact Flash card ($10). [Total: ~ $160] These are also available in the US from mini-box.com as are cases and power supplies, but they don't have the red anodized cases. The Alix2c3 requires only 6 Watts peak of power to run -- approximately 1 Amp of any voltage between 7v and 18v.
NOTE: if you want a Real Time Clock battery, that must be requested, for an additional $1 charge.
The pictures below show the Alix2c3 with the optional RTC battery, and housed in a red USB case. As you can see in the pictures, the 500 MHz AMD Geode LX processor that these use don't even need a heat sink for cooling, so there are few if any concerns related to heat.
[Click on the photos for a larger image.]
There are several operating systems to choose from that will run on these boxes, but I much prefer running Debian.
HOWTO: load a PC Engines Alix2c3 with Debian Wheezy
Okay, so below is the procedure.
All of this work is based on this page, so that's who deserves the real credit for figuring out most of this procedure. [I'd like to give the author credit but can't figure out who it is -- Yasuyasu?]
Here's another page about loading the Alix2c3 with Debian Sid: Peter's Alix2c3 page
1. The first thing you need is a LiveCD that runs something Debian-based, which could possibly be a Knoppix CD, Ubuntu Live CD, or from an installation of Ubuntu or Debian. What's necessary is the debootstrap binary. [It's one of the ways that Knoppix CDs can be made, too.]
2. Attach the Compact Flash card to a CF card reader. Both PCMCIA CF card readers, or USB CF card readers work, but depending on which you use it may change which device the CF card shows up as. Usually it shows up as either /dev/sd? for USB or /dev/hd? for PCMCIA -- use 'fdisk -l' (that's a lower-case L) as root after attaching the CF card to a laptop running Linux to find out which device it is.
In my case the CF card device showed up as /dev/sdb -- your milage may vary. Wherever you see "sdb" in the instructions below, replace it with the device that is detected for your CF card.
3. fdisk /dev/sdb # (or whatever device your CF card shows up as)
Delete any partitions that are there, and make a new one that uses the full space.
The new partition in my case showed up as /dev/hdc1
4. mkfs.ext2 -L <volume-label> -c -v /dev/sdb1 # to format the partition with ext2
The flash chips in Compact Flash have a limited number of writes, so it's generally a good idea to use a non-journaling filesystem, or a filesystem designed for use with flash chips, such as jffs2... but jffs2 takes longer to boot, so I've been sticking with ext2 for CF cards. [The LogFS filesystem is also available in the kernel, but is not considered stable enough for real-world use yet.]
5. tune2fs -c 5 -i 30 /dev/sdb1
This sets the periodic fsck at boot time based on how many times the filesystem has been mounted without a check to 5, and the maxiumum number of days without a check to 30. This insures that the filesystem will be periodically checked when the system is rebooted.
6. mount /dev/sdb1 /media/cf_card -o sync # mount the filesystem locally to a previously created /media/cf_card directory, syncronously
Strangely enough it seems to be best to do this first before actually installing Debian:
7. grub-install --root-directory=/media/cf_card /dev/sdb #Installs the grub2 boot loader.
8. time nice debootstrap --arch i386 wheezy /media/cf_card
This downloads and installs the minimal Debian Wheezy files from the internet, so internet access is required.
This takes at least 20 minutes to run. You can also load another release directly at this point instead of wheey if you want to (but not sid), but I prefer to run the stable distribution of Debian for servers.
9. Several directories from the current running LiveCD or other Linux environment need to be mounted with a bind mount onto the newly created Debian installation on the CF card so that the Grub2 boot loader can find hardware devices and partitions. The Grub2 installation will fail if this is not done first.
10. chroot /media/cf_card /bin/bash # enter the installed environment
10. install 'locales-all' and set a default language so that apt-get and perl doesn't complain about missing language information.
If you instead want to use UTF-8, instead use:
11. nano /etc/apt/sources.list
Set up the repositories by modifying the sources.list file to contain:
12. apt-get update # update the local Debian repository
13. apt-get install grub2 less ntp
This will cause apt-get to add several other packages as well:
Choose 'Y' or simply press Enter, as that is the default.
grub-pc will ask if it should be installed without being configured. Choosing 'No' will simply bring up the same question again, so the only thing possible to do at this point is to choose 'Yes'. Or, grub-pc may come up with a menu of which devices to install GRUB onto; for the moment leave these entries blank and choose "Okay".
14. nano /boot/grub/device.map
Edit this file to remove entries that are not related to the CF card. For example after I installed Grub2, the device.map file contained the following:
Instead you most likely want to detect the boot device by UUID. First, run 'blkid' on the CF card device to find the UUID:
(When I ran the above what I got back was:)
Modify the file to use by-uuid instead:
14. nano /etc/default/grub
In this file, under the '#GRUB_TERMINAL=console' line, add the following:
This configures the Grub2 boot loader to output the boot menu to the serial port. This is important as this is the only way to have access to the boot menu.
Additionally, at the end of the file add the following to keep OS Prober from trying to detect alternate operating systems:
15. update-grub
Answer "Would you like /boot/grub/menu.lst generated for you? (y/N)" with Y.
16. ??? nano /etc/kernel-img.conf
Populate the kernel-img.conf file with:
17. apt-get install linux-image-486 # install Linux kernel for 486
This will again pull in several other packages:
Say 'Y'.
If you've installed the grub package and properly modified the /etc/kernel-img.conf and /boot/grub/menu.lst files, then at this point when the kernel is installed the grub boot menu will be updated automatically.
18. nano /etc/fstab
Populating the fstab file requires finding the UUID of the filesystem in order to mount it in a driver inspecific way. In other words, if the underlying device is /dev/hda1 or /dev/sda1 it is desirable if either one will work. To find out the UUID of the filesystem in order to mount either one, use the following command:
Then use the UUID of the filesystem to populate the fstab file:
"noatime" and "nodiratime" are mount options that reduce wear on the flash by eliminating writing the last access time on files, which is not very useful to have anyway. [I use these mount options on all of the disk filesystems on my desktop, for instance.
19. nano /etc/inittab
Modify the inittab file in the following way:
20. nano /etc/network/interfaces
Populate the interfaces file with:
21. apt-get dist-upgrade
Updates installed packages, including security updates
22. exit
23. unmount CF card related filesystems:
24. If you're using a USB CF cardreader you do not need to do anything at this step.
If you're using a PCMCIA CF cardreader, tell the system you're about to remove the CF cardreader with:
Connecting to the Alix2c3 with a serial cable
This requires a 9-pin serial cable [wired the standard way] and a serial null modem. From a computer running Gnu/Linux you can either use minicom or ckermit, or you can use HyperTerminal from Windows. For connection settings use 38400 8N1 with no hardware flow control. Run 'minicom -s' as root to edit the system-wide defaults when that is desired. Both minicom and HyperTerminal are newer and easier to set up than ckermit.
To configure minicom to connect to the COM1 serial port:
To configure ckermit to connect to the COM1 serial port:
After connecting, plug in the Alix2c3 to see the bootup messages. You should see something similar to:
... and then the GRUB boot menu appears. If all goes well, Debian will boot automatically and you will be able to log in as root without any password.
Next immediate steps to take:
1. Run passwd to change the root password, and write the password down somewhere.
2. Connect an ethernet cable to the first RJ45 jack on the Alix2c3, closest to the power and USB ports. Assuming you have DHCP locally available and you followed step 20 of the installation, this should allow the box to get internet access.
3. Run ntpdate -u pool.ntp.org to update the system time. This is rather important to do because Debian will complain during new package installation if the clock is far off.
4. If ntpdate ran successfully and updated the system time (you can verify that with the date command), then push the system time to the hardware clock with hwclock --systohc
This step is optional, since the system clock will be pushed the hardware clock at shutdown or reboot anyway.
5. Install ntpd
6. Installation of Grub2 on a CF card using an external computer leaves the device.map file containing incorrect settings. This can be fixed with grub-mkdevicemap -n. Unless this is executed, any execution of update-grub (which includes any kernel updates) will cause the Grub2 configuration file grub.cfg to use the raw device /dev/sda1 rather than hd0 in the "set root" setting in menu entries, leaving an unbootable configuration.
7. Set the timezone with dpkg-reconfigure tzdata
From here, there is a nice writeup from Hacom with some suggested tweaks to keep from writing to the CF card too often, which also helps protect the CF card from being corrupted in the case of power loss or unclean shutdown.
Now that you have a running system, you can take it from here. :-)
Good luck!!
-- Chris